Stay up to date
NFAA News
NFAA News
May 02, 2018
Arrow Culling
Article by Rod White, NFAA Bowhunting and Event Coordinator. Rod is an Olympic Gold Medalist and Professional Archer. Subscribe to the NFAA Youtube Channel and watch NFAA Talks with Rod White at: https://www.youtube.com/user/NFAAUSA/feed
This may seem like a target archery specific type of blog post...but not at all! In fact, from an ethics perspective, it may be even more important for those of us who are only concerned with bowhunting- in regards to choosing to shoot fixed blade broadheads. That said...if you're a competitive NFAA target archer, you are already likely aware of the importance of ditching arrows from your quiver that aren't hitting their intended targets. If you're not already doing so, you can significantly improve your scores by implementing this process. As for bowhunters, we owe it to the game, to do all that we can to make sure our arrows are hitting their marks. Regardless of the discipline you choose in this great sport we call archery, this is an important topic that we most commonly refer to as "Arrow Culling". This month's blog is written to address the needs of the average bowhunter and most amateur competitive archers. Next month, I will get very detailed for those hunters who desire to expand their effective ranges and for those competitors wishing to compete at the highest levels.
So where do we begin? Target or bowhunting, my arrow selection, building, and culling process is the same. If you fletch, cut, and assemble your own arrows, there's quite a bit you can do to ensure that all of your arrows share consistent impact points. Again, I'll address advanced procedures in next month's article. To begin with, just choosing a brand, let alone diameters, spines, weights, or component systems can seem incredibly overwhelming. Multiple companies make strong models with incredible consistency compared to just 5 years ago. Brands like Easton, Gold Tip, Black Eagle Arrows, and Victory Archery lead the market with some of the most impressive lineups and labels in the industry. The most popular stars include the Olympic medal winning Easton X10, the highly decorated 3D-winning Gold Tip Triple XXX, the deep penetrating micro diameter Black Eagle Deep Impact, and now the new Victory Extorsion, with an entirely new hybrid material technology. All are extremely well constructed with exacting purposes. And, with each new year, comes new standards in consistency.
Before we get into the process of potentially resolving arrow inconsistencies, we'll need to identify which of the arrows in our quiver are problem arrows. The number of methods archers use to identify and resolve arrow inconsistencies are astonishing. Some of these methods work, while others simply don't work at all, but sound great in theory. Part of these methods require tools that are unaffordable, require advanced shooting skills, or simply marketing hype. So, for the purpose of this short blog, I'm going to stick to the basic and most effective method that I've used personally and successfully.
First, let's address those of you who are shooting pre-fletched arrows. Buying pre-fletched arrows does indeed limit an archer on how much you can do to ensure consistency. However, there are techniques you can do to sort out, remedy, and remove trouble arrows. Let's assume you purchase your arrows at a shop and have them pre-cut and points installed.
Start by numbering your arrows with a fine point permanent marker. Most vane manufacturers have a surface that allows you to write on the vanes, otherwise you can number the shafts with a silver Sharpie marker. I also use a grain scale like shown in the picture below to measure fully assembled arrows. The variations from arrow to arrow generally revolve around the type and amount of glue used in the points or inserts, especially if you're a target archer using break off points. I number each arrow individually with the weight of the finished arrows like illustrated here, which allows me to immediately identify an arrow that is too heavy or too light. I try to keep my finished arrows around + or - 2 grains or better for target archery, and + or - 4 grains for hunting arrows with broadheads installed. Removing the points (if you're using a hot-melt adhesive) and removing any excess glue, filing the point lightly, and installing the point again, quickly gets a heavy arrow back in line with the others. With a light arrow, I'll try installing a different point or insert. Broadheads can also usually be shuffled from one arrow to another to accomplish this as most manufactured broadheads seem to have weight tolerance variations in a 2 to 3 grain margin depending on the design.

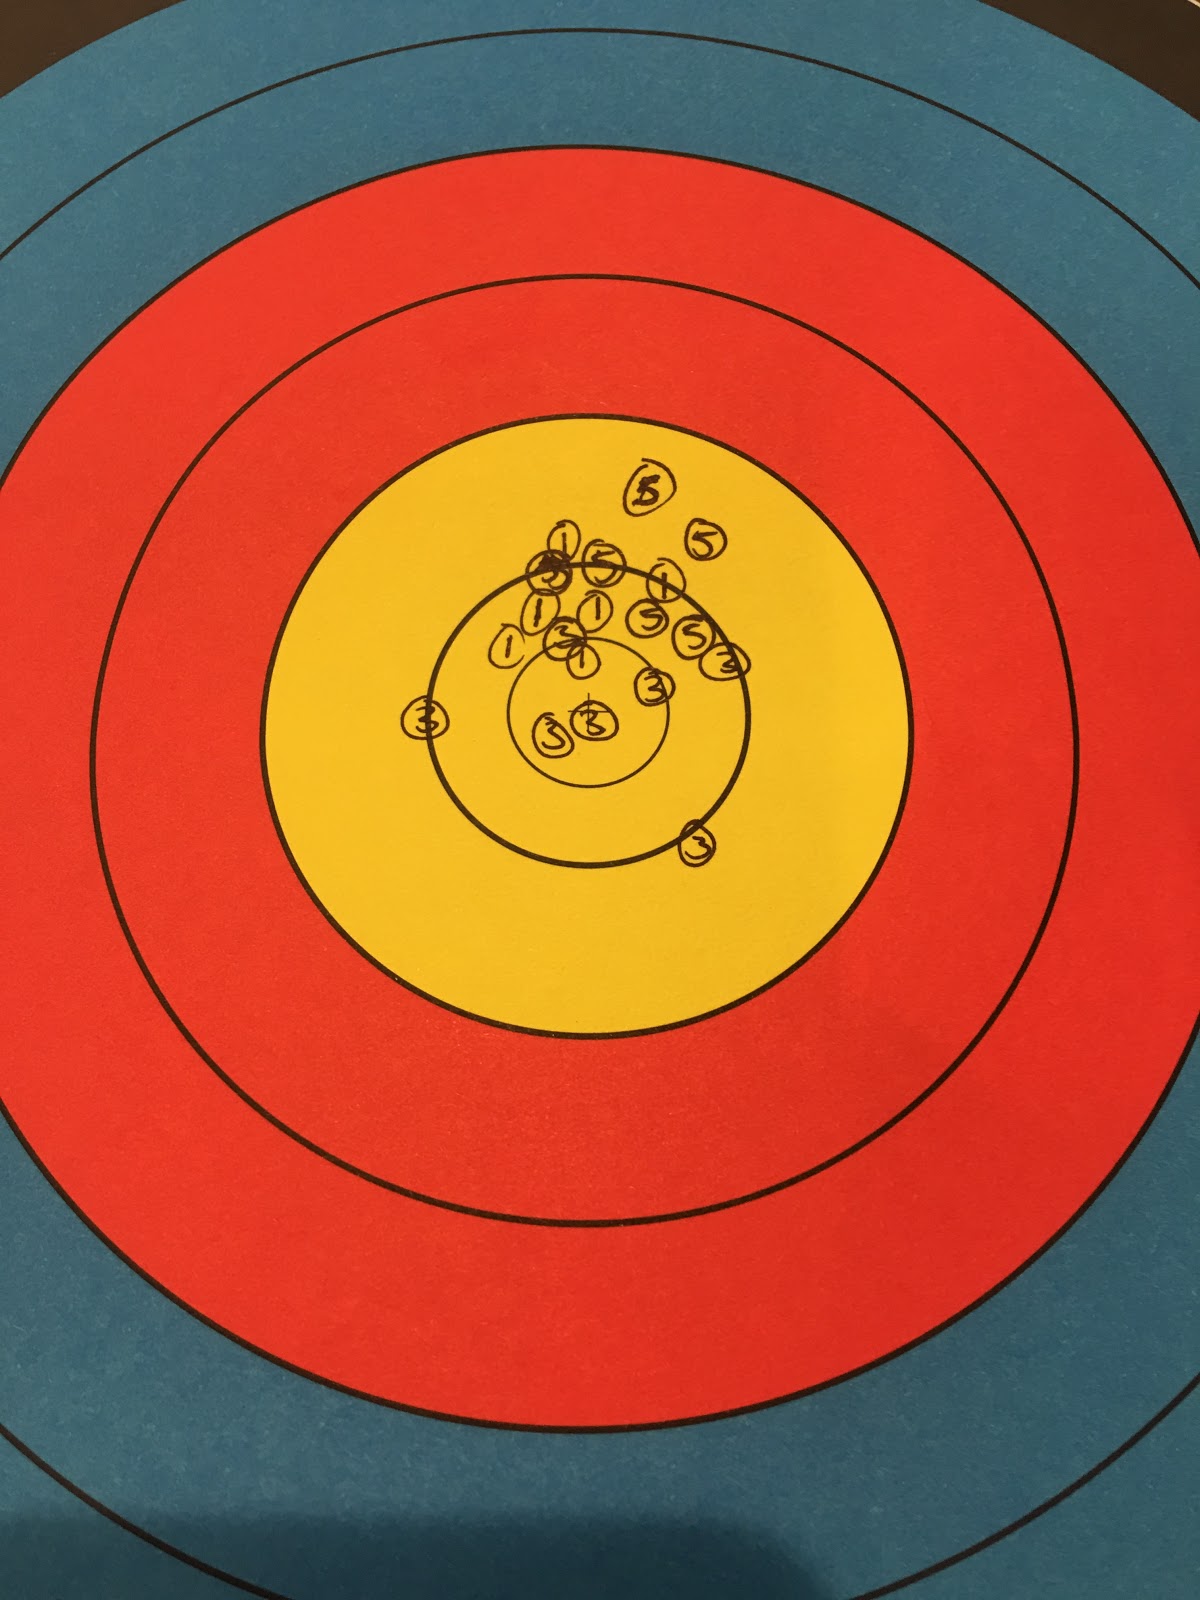
After numbering your arrows, this is the point where controversy over the best way to identify problem arrows come into play. Again, in next month's blog, I'll address advanced arrow building and culling. So to keep this simple and effective, you can use an app that individually tracks arrow impacts on your smartphone. To keep this article timely, and because apps seem to come and go, I would suggest just exploring apps in your app store or android device. I personally have the app, ArcherZUpshot, still installed on my iPhone, although I don't believe it's available anymore. In that app, I can track individual arrows on multiple scoring rounds on a variety of target faces. The app makes it super easy with a feature that will centrally locate all of those impacts you recorded. Then I simply screenshot each round (which is labeled by arrow number) and then I compare them to make sure each arrow is impacting with the others. This should be done at the furthest distance that you feel you can shoot consistent groups. It's important to note that during this process, you do not record impacts from shots that you feel were anything less than perfect or aimed where you intended. After comparing screenshots, pull out the numbered arrows that are not consistently impacting. In the app that I'm using, each arrow needs to be entered as a different round to do the analysis. I'll address a couple options shortly to potentially get those arrows to impact with the main group. The screenshot images here are from just two of my single arrow groups. You can see that one of the arrows groups equally well, but consistently impacts slightly different than the other arrow at 50 yards. My number 6 arrow plot is on the left and my number 8 arrow plot is on the right. The majority of my arrows grouped with my number 6 arrow.


If you don't have an app, or can't find one available for your device, you can also use two targets of your choice. One to shoot at, and one that you'll record your arrow impacts on. Both methods produce the same results, it's just a matter of which method you find more comfortable and easy to use . With either method, you'll want to shoot on a calm day, and only continue the process if you feel you are shooting at your normal shooting level. . Additionally, you should plot all of your arrows that day at the same time. In my experience, I find I make more consistent shots when I shoot groups of 4 arrows at a time. Generally I'll shoot 6 ends or groups for each group of 4 arrows. So shoot arrows labeled 1-4 6 times, shoot 5-8 6 times, and 9-12 6 times. When shooting groups, be cautious of arrow impacts to other arrows. If you damage a nock or adapter, and in some cases where there's no damage present, you certainly can skew results for a single arrow. If you're shooting indoors, to prevent arrow damage, you'll use a 3 spot of 5 spot target at 20 yards. During plotting, indicate arrow impacts by writing the number that represents each arrow on the target face that you're using to plot arrows. When using a 3 spot or 5 spot face, I find it easiest to plot on a single spot of the same size. The photos here show the target from testing 6 numbered arrows. You can see how this method quickly gets difficult to examine more than 3 charted arrow groups at a time. Although I don't have an example here, the Archers Advantage computer program allows you to print scaled targets and can save you a considerable number of target faces.


Now that you have identified arrows that aren't hitting with the majority of your arrows, let's attempt to get them to impact in the same spot as the others. In next month's blog I'll dive further into issues regarding trouble arrows, but again, to keep this simple, I'm going to walk you through a simple solution. Be aware that it is very possible that some arrows simply won't group with the other arrows no matter what you change. In this scenario, just discard the arrow and label it as a bad arrow. In the past, arrow consistency on all levels has been an issue, but with today's manufacturing processes, I simply don't see the number of issues I have in the past. Especially with higher end brands and models.
With each attempt to change an arrow's impact, you should consider shooting that arrow several times to be sure that you are indeed getting a solid result from that change. The easiest option is to first check your problem arrow for clearance. Often nock issues are not spine related at all, but clearance related. This is, of course, if you are shooting a blade type rest or any other rest that does not fall into the category of a fall away rest. If you are shooting a drop away rest, and you're certain your rest is set up properly without any clearance issues, skip to the next paragraph and proceed. With a stationary or fixed rest, you may not need to rotate the nock much at all! First, look at one of your arrows that are grouping by nocking the arrow on the string and looking at the arrow vane rotation. Then check your problem arrow to see if the orientation of the vanes in relation the blade or supporting arms of the rest is the same. If they don't appear to have the same clearance, rotate the nock slightly on the problem arrow to make the clearance the same in both arrows. The picture on the left shows a slight clearance issue that was easily resolved with a slight turn with a nock tool.


If, after making small adjustments to your problem arrows for clearance, you still have an impact issue, rotate the nock of the problem arrow(s) 120 degrees for a 3 fletched arrow and 90 degrees for a four fletched arrow. Take note of the direction and amount you rotate the nock. Reshoot that arrow after you've made your adjustment. Again, check each arrow impact several times and be honest with yourself in regards to the quality of your shot and where your sight pin was when the arrow was fired. Repeat this if necessary until you are back to where you started in your nock rotation. IMPORTANT: if you have a nock tool that fits your nock, use it! A nock tool is a small plastic device used to rotate nocks and is usually specific to the manufacturer of the nock. DO NOT use pliers to rotate your nocks. If you can't physically turn the nock with your fingers, it's best to just remove the nock and install a new nock. Yes, you can use an allen wrench to rotate the nock by placing it in the groove of the nock or nock the arrow on your string and twist the arrow, but either of these could cause more damage than create a solution. The damage caused is often very difficult to see without a quality arrow spinner. Nock ears are easy to bend on most nocks and pliers often warp the nock. Photo of the Beiter nock tool...

If you are still experiencing an issue, and you have not already done so, remove the nock from a trouble arrow and replace it with a new nock and repeat the process. If that arrow is still giving you problems, all that you can do now is to try to square the back end of your arrow or it's nock adapter, with an arrow squaring device. Then reinsert a new nock and attempt to plot the problem arrow again. G5 makes a simple device for this exact purpose and is also extremely nice to have later when you are attaching broadheads. It's a tool that you won't regret buying. However, with pre-fletched shafts, you can't square the nock ends without removing vanes and re-fletching. I mention because it's a vital component to any bowhunter that chooses to use fixed blade heads. There are also some other squaring devices that can be used, such as the firenock system that will allow you to square the back ends with the fletching on, but I'll save that for the next blog. It's not a cheap solution, but it's worth it's weight in gold when it comes to overall function. Photo of the G5 ASD...

Finally, if, after all of that, you still have issues with an arrow's impact, it's best just to discard the arrow completely. I highly suggest that you enter into this process only after being very happy with your overall setup and have confidence that you are shooting a well tuned bow. Regardless of the manufacturer, some of the processes of manufacturing specific models of arrows tend to produce more trouble arrows than others. Marketing and bias aside, at the end of the day, you'll need to find the right arrow that fits your needs best and falls within your budget. Some of the best tolerances in all categories of arrows are not always the most expensive. Until next time, hunt safe and shoot straight!!